Download and extract the latest version of IBM Rational Software Architect Designer for Websphere Software. In this case it will be 9.5.0 64-bit. Out of convenience place your disk1 and disk2 folders inside your RSA4WS_SETUP folder if you have downloaded them as zip files. That way you won't get prompted during the installation process to point to the location of disk1 and disk2.
Next open Installation Manager and go to File->Preferences. Here we want to "Add Repository..." and have it point to the location of repository.config in your RSA4WS_SETUP folder. Next we want to add a second respository and have it point to http://www.ibm.com/software/repositorymanager/com.ibm.websphere.BASE.v85 so we can download updates for our software. There will be a user name (IBM ID) and password prompt in order to download updates. In the next prompt uncheck master password.
Back in the main menu click on Install. In the next window toggle which products you want to install. In this case we will be only installing RSAD 9.5. Click Next, Next, accept the terms, and Next. In the next screen create a new package group if you don't already have one for 64-bit installations.
Click Next and Next. Now in additional to the default features we want to add some additional items to our installation. For this specific installation the easiest way to do this is to select "Architect - Minimal", "MDD for Java - Standard", and "Service Architect". Selecting the dependencies is unnecessary. The Manager will automatically include it as part of the install process. We also want to install the server tools for Websphere Application Server 8.5. You don't need to install the stub if you plan to install WAS 8.5 locally. In addition we will also be installing all of the "Code development and quality tools" and Maven Tools. Then Click Next.
Click Install. Once the installation is done we will need to apply a license. Go back to the main menu of Installation Manager. "Manage Licenses" Toggle "Import product Activation Kit" and click Next. Click on Browse and find the RSA4WS95_Lic.jar in your RSA4WS_v9.5_Activation_Kit folder. Click Next, accept the terms, and Finish.
Next we will install IBM WebSphere Application Server. Download and extract the latest version of WAS. In this case it will be 9.5.0 64-bit. Out of convenience place your disk1 and disk2 inside your WAS855 folder if you have downloaded them as zip files for the same reason we did it for the RSAD installation. Next open Installation Manager and add a new repository pointing the location of diskTag.inf in your disk1 folder.
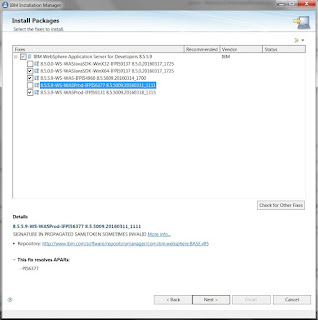
 Back in the main menu click on Install. Select IBM WebSphere Application for Developers in Installation Packages, Click Next, accept terms, and Next. Here we will check all fixes except for WinX32 (since we are installing the 64-bit version) and older fix packs that will trigger conflicts (in this case that will be IFPI56377). In this next screen create a new package group, then click Next, and Next. In Features, make sure IBM 64-bit WebSphere SDK for Java is checked, then click Next.
Once the installation is done we will configure RSAD and WAS. Open RSAD and if you are using an existing workspace you will have to go through a migration process to update them. In the Workspace Migration menu accept the default suggestions, click Next, Next, and Next.
If this is your first time you will get a prompt to create a server. If necessary, uncheck the requirement for admin name and password and accept the defaults. In your "Java EE" Perspective and go to your Servers tab. Right click on the server and in the context menu go to "Add and Remove...". Highlight your EAR project and click Add and Finish.
Otherwise in order to create a server open your "Java EE" Perspective and go to your Servers tab. In the right click context menu, go to New->Server. Select Websphere Application Server v8.5 and click Next. It will probably prompt you for the location of your JRE. Browse to C:\Program Files (x86)\IBM\WebSphere\AppServer and click Next. If necessary, uncheck the requirement for admin name and password and accept the defaults. Click Next to go to the "Add and Remove..." screen. Highlight your EAR project and click Add and Finish.
Next right click on the server and Start. Right click on server, Administration, "Run Administration Console". In here is where you will have to configure your bus, destinations, connection factory, queues, activation specifications, data source provider, and so forth. We won't go into detail on this because it is user specific and rather involved.
I want to add that if you double click on your server in the Servers tab you will open up an overview. I recommend going to your Publishing settings and toggling "Never publish automatically". It will remove a major annoyance that will often crop up while you work. Make sure to save so your changes will go into effect.
Lastly note that if you are running a application-managed enviroment you will need to run wsenhancer.bat when building your files in order to inject necessary bytebode into your JPA entities. This file can be found in C:\Program Files (x86)\IBM\WebSphere\AppServer\bin. I recommend setting it up in "External Tools Configuration" and set your Working Directory to ${workspace_loc:/"location of project"/"location of entities"}
No comments:
Post a Comment